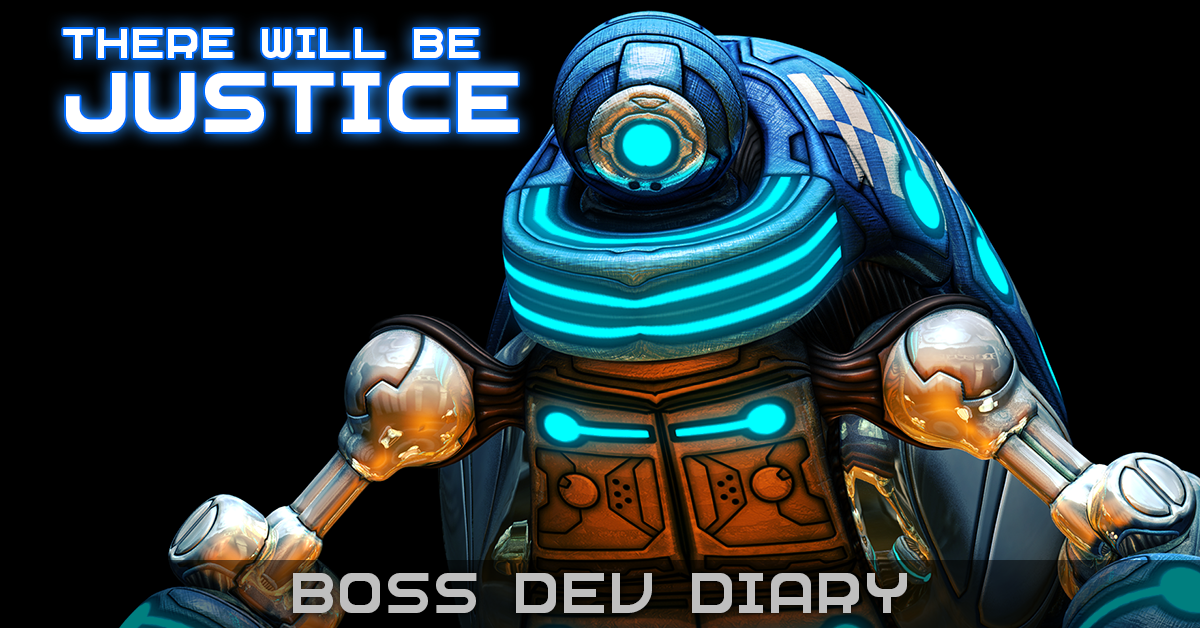
It’s been a little quiet lately, we’ve been up to various things but a lot of it isn’t very visible! So I thought I’d talk about the next boss that’s on it’s way, codenamed Justice!
He lives in zone 3 which means he is ‘security themed’ and his inspiration is tortoise. Everyone keeps saying he looks like a turtle, which he’s supposed to, except turtles have flippers, so he’s a tortoise. But I don’t want to go too deep into his character, instead I’ll focus on the production aspects for this post.
His design started with a spirited brainstorm session at a nearby burrito place where we worked out some of his possible attack patterns. With his capabilities in mind I started sketching until I had something promising then drew up cleaner front and sides (and in this case a top view too, to figure out his funny body shape) to use as a modelling guide. I drew his limbs separately so they wouldn’t overlap the body.

while designed to walk on all fours, this boss is capable of standing up and calling for a time-out if he thinks things are getting silly
With the ‘studio’ in place I got stuck in to modelling. My approach is to get rough polygons in place as quickly as possible to block in the general form. Not only does this sudden rush of progress make me feel better (enthusiasm management – a vital component of independent development) it gives me a framework to attack the more fiddly details.
Once I had enough in place to ‘understand’ the body (I focus on the large planes and leave any connecting tissue for later) I hid it away and started on the legs. My general modelling method is to create polys for any flowing surfaces and hack apart primitives for anything regular. FFD’s are awesome for shaping sort-of regular shapes like the big disc that makes up most of his sides. I ended up using a Boolean union to build the cylindrical cross sections to the back of the legs which is rare for me since it generally results in me cleaning up stray verts forever. Please talk to your kids about the dangers of Boolean mesh operations.
With the back leg done I salvaged parts for the front leg and modelled his surfboard, bolt and bolt housing. With legs and the primary body geometry in place his silhouette was looking promising and it became all about subdividing his body quads, cutting in detail, building an internal cavity for a gameplay reason I won’t go into and connecting everything up.

if you noticed the sketch includes a third toe at the rear of the foot, it means you notice things more than me
The main change I made (other than cleaning up a few more stray verts left over from that Boolean operation that I’d accidentally propagated to the forwards legs) was to add a bit more geometry behind the rear panel to block up that gap you can peek through. And that means it’s ready to UV unwrap! I hate UVing! Time to throw it into Roadkill!
I start by deleting everything I don’t need two of (half the body, and half the legs since they’re symmetrical) then physically separating everything with fiddly faces (such as the bolt connecting the surfboard and his back panels) I move them by increments of 10 so they snap right back together when I’m done.
Roadkill needs good seams to do a good job so I work my way across the mesh snipping and splitting as best I can. This unwraps the individual pieces quite nicely and I bring the whole thing back into MAX where I have a great big pile of random pieces. Time to pack them a little more logically! My workflow for this is a bit like when I used to play with Lego as a kid – step one is to drop everything into piles so you know what you’re dealing with. (I normally try to rotate things to face ‘upwards’ if I can – always rotate things to fit better when needed, but if things are facing up it makes painting textures way easier) The material scheme of Justice means things fall into broad categories like coloured panels or metallic chrome or the parts in between, which are generally treated as masses of cabling.

the really fun part is trying to figure out what random square squiggly shaped bit is what
Once I’m happy with the UV’s, I can symmetry / duplicate and stitch the mesh back into a complete four legged character, clean up a few extra verts from that Boolean operation that I missed earlier and do a quick and dirty colour pass so he technically has a texture. I use this as a chance to work out where his indicator lights will go. Next I import the other bosses and Cactus and check his size. He’s totally wrong so I scale him way up until he’s about Embryo’s size while on fours. That means when he stands he’s going to tower over everything, and Sanatana thinks this is a bit crazy, but I think it’s mad cool. I’m also pretty tired by this point and my judgement might be impaired. I decide to lock it in.
Compared to Vespula his rig is standard, I use a normal Biped with horse legs and hands set to legs. (no thumbs!) The only custom bit of rig is adding an extra knee joint that uses a orientation constraint so the curved knee protector part doesn’t rotate completely with either the thigh or the calf. And the controllers for the unspecified gameplay reason of course. He can now be posed! I give him a quick “I belong in Panzer Dragoon” pose and throw him in engine and run around him to check how this feels.

yes he’s completely inanimate but holding an S+ against the boss of world 3 is still pretty good!
I clean up a few things I noticed with the rig, and decided to do a test animation! I like animating! Plus it’s a great way to figure out if there are any limitations with the rig before I go too nuts. And that’s where I’m up to! Hope you found this interesting!

On a final note, one of the reasons we’ve been a little quiet is that we have been preparing for the Game Developers Conference in San Francisco! The three of us are going to be there for the first time ever! If you’re attending GDC, watch out for us and Assault Android Cactus, we’ll have the game on display and hope to meet a tonne of interesting people and learn lots of cool stuff.